Potato Pancakes

A couple of weeks ago, while sitting in a Mexican restaurant about to eat our breakfast tacos, Iain said, “Mom, I think something’s wrong with this taco. The eggs are kinda pale-ish.”

“My son,” I explained, “that is because in 6 months, you have become accustomed to the vibrant and flavorful egg that is laid by the pasture raised chicken. These ordinary eggs will no longer satisfy your palate or your senses.”

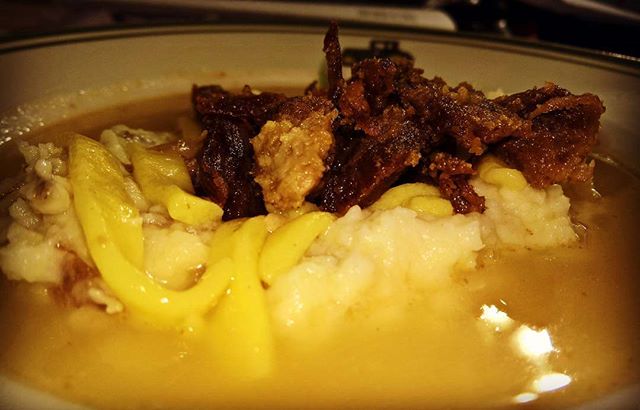
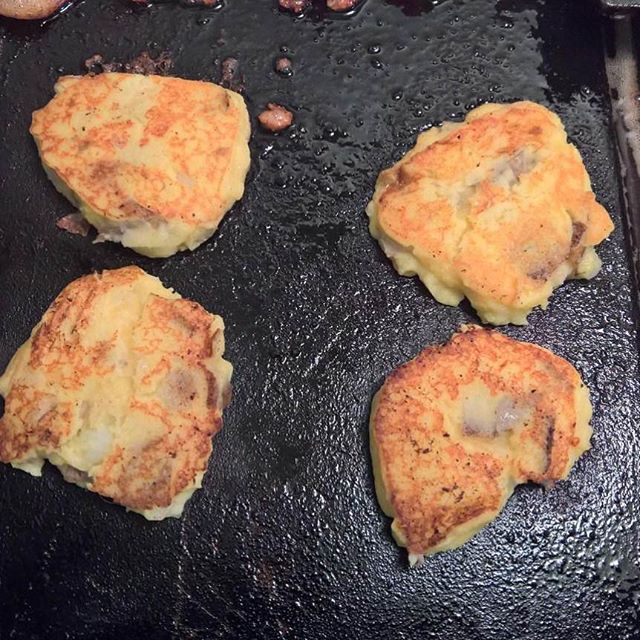
I tell you this story because my potato pancakes are very yellow. More yellow than I have ever seen a potato pancake. Not an unappetizing shade by any means, but you’ll be hard pressed to replicate our yellow patties without farm fresh eggs. And while the eggs are delicious, the secret to a really good potato pancake is in the mashed potatoes, not the eggs; and the secret to great mashed potatoes is cream cheese. Start with good potatoes, you get great pancakes.

Great breakfast side for your eggs and bacon. Start your bacon first, because you want to fry these babies in plenty of bacon grease, a bacon grease deficiency can be detrimental here.

View the recipe on PepperPlate.com

Yield 6 pancakes
Active Time 15 minutes
Categories breakfast

Ingredients
1 cup leftover mashed potatoes
1 egg
1 teaspoon grated parmesan cheese
1 small clove garlic, diced
1/2 teaspoon parsley
1/2 teaspoon chives, onion greens, or onion powder, optional

Instructions
Combine all ingredients, drop by ice cream scoop onto hot greased griddle or skillet. Flatten into pancake shape. Flip when golden brown, serve hot.

Shallots

Any plant that doesn’t need my help to stay alive is welcome in my garden! These shallots were given to me by a good friend shortly after we moved in last year, we put them in the ground, then had a pretty good drought. I was sure they, along with everything else we had planted, were gone. But lo and behold, after several months of neglect, when I went to revive my fence line bed, there they were!

We love harvesting the greens to add to soups, soft cheeses, butter, or eggs. Shallots are typically planted in the fall, they come to maturity early summer for harvest. They are a member of the onion family, and can be used interchangeably with onions in your recipes, and the greens used where you would use green onion or chives.

I hope to have them growing in perpetuity, as shallots reproduce a lot like garlic, with a mother bulb that divides into multiple bulbs, but the offspring bulbs are not encased in the papery husk that garlic has. I’ll be saving part of the harvest to plant next year.

Livin’ the 9.5

This year – Christmas 2016 – was the first year for us on our farnch (half farm, half ranch, hence “farnch”). Each of the kids has adjusted well to life at Livin’ the 10 – for the most part. They recognize that things are different out in the country, and we’re helping them to understand the value in self-reliance that you need when you’re out here.

farnch

both a farm and a ranch

Speaking of self-reliance, the value in self-reliance was driven home a few days before Christmas…when the water main running to our house sprung a leak out near the road. We (Melissa and the kids, mostly) dug through muck and mud for three days before we found the leak. It’s a lot of hard work being self-reliant. But the good news is that our kids have a newfound appreciation for plumbers. Iain’s even thinking about taking the odd plumbing job…as long as he gets to play in the mud a bit while on the job.

While we were digging, our first order of Livin’ the 10 ZubieWear T-Shirts and sweatshirts arrived. Oscar Zubiate has been a friend for a while, and he and the team at Zubie Wear did an excellent job on the apparel. As we were groaning and moaning through the muck and mire, we laughed to ourselves that while our overall experience on our property has been a 10, today might be a 9.5.

The roughly one-foot section that we replaced

It could have been much worse, though. It wasn’t a massive leak, so we were able to turn the water on for 15 minutes and run everyone through the shower, flush and refill the toilets, etc. Plus, we saw first-hand the benefits of some of our self-sufficiency-minded “preps.” First, we have a commercial ice maker (I love ice) which holds about 25# of ice. Even though it didn’t produce ice during these three days, we still had ice. Second, because we have many gallons of drinking water stored, we were able to cook and brew coffee and tea, etc. Thinking ahead and having a little extra on hand limited the second- and third-order effects, and turned this into an endurable experience.


Setting Up A Classroom

You may be debating the necessity of having a dedicated space for a classroom, and rightly so, with so many learning opportunities available either online, or through alternate locations such as museums, libraries, and COOPs. I see a classroom-less homeschool as a real possibility for us at some point in the future. But as my students are still quite young, learning through doing requires supplies, and supplies need a space. The manipulatives required for concrete learning of abstract concepts have to be available, and easily accessible for the kids, as well as simple for them to put back. We have made one of our bedrooms useful as such a place, with workspaces for the kids as well. And though they do enjoy curling up in the window seat when they read, they usually end up bringing their activities out to the living room floor or the dining room table. Here is how we have the classroom organized:

On the left, unpictured, is our Library shelving, then you can see one of the desks designated for art or writing activities. Behind that are the Montessori manipulatives, each shelf a different category; one for Sensorial learning, one for Mathematics, and several of the shorter ones at the top house the large map puzzles for Geography. The very top shelf holds media based learning, DVD courses and the like. Beneath the window seat reading nook, the lacing, snapping, zipping, and tying frames hang. In the closet on the right, there is a shelf for wooden puzzles (an extension of Math and logic), The large science manipulatives, natural world math manipulatives, puzzles, and the imagination station. There is another desk situated on the left wall, and between it and the closet is the writing shelf, with different types of paper, activity books, writing utensils, and grammar activities, including the grammar boxes, and metal insets. Here’s a better look at that desk

which is predominantly used for their art projects. Their art supplies are organized (well, as much as art supplies CAN be organized) in the green corner cabinet, pictured here. Because of it’s proximity, the desk is quite frequently covered in clay and paint. Next, these are what I used to deem circle time activities.

Calendar building, Pouring and tweezing activities, Nomenclature and three part card activities, and some construction activities. On the other side of the doorway is our Library section.

The kids are welcome to read any day for school, but on science days, they have to read science books, on history days, history books, and so on. So our books are organized by subject. Literature, Languages, Math, Art, Sciences, History, Theology, Easy Reading, and Magazines. On their reading days, they have the freedom to select any subject they choose.

Even as the kids outgrow their need for manipulative based learning, we will always have a library. This room will more than likely one day become a bedroom, but for now, it is a place for them to learn and read, build and explore, and grow.

Partnerships

It may not look appetizing, but our animals absolutely love spent grain.

Several years ago, we met Ricardo and Jennifer Garcia through a mutual interest in trading stocks and options. Over the years, that mutual interest has grown into a friendship. A common thread in our friendship is the desire to become more independent, self-sufficient, self-reliant, etc. So when Ricardo mentioned that he was following his dreams of opening a brewery, Melissa and I knew we wanted to be a part of that.

In addition to brewing the best beer I’ve ever tasted – bar none – our animals absolutely love the spent grains.

One of the win-win deals we were able to negotiate with Ricardo was being an early participant in the brewery in exchange for the spent grains from his brewing activities. In addition to brewing the best beer I’ve ever tasted – bar none – our animals absolutely love the spent grains. The chickens and guineas love to scratch and pick through it. The pigs chomp it down faster than you can get it to them. And to the donkeys, it’s ambrosia. On Ricardo’s side of the deal, he now has a sustainable outlet for what would otherwise be a waste product that he would have to pay to dispose of.


Blackberries!

One of our favorite summer activities, even as cityfolk, was taking a trip to a pick-your-own farm for fresh blackberries, strawberries, peaches, and other colorful and flavorful produce. We tried planting fruit trees in the yard, but the greenbelt in the neighborhood brought out the deer every night, and they’d strip the plants of any leaves and buds. We never got to reap the benefits of our poor besieged plants, and unfortunately, being in the city limits, we couldn’t shoot the deer. Pity, because then I could have had peaches, AND venison ?!

Now that we have some room to stretch our legs, we started planting some fruit trees. Among our first plantings was a bunch of blackberry vines along the fence. Nothing producing yet, as a matter of fact, they are quite dormant, as are most of our early plantings. We should have some great blackberry recipes coming this summer. And just let those deer try to get to them first…

Beef & Noodles

Beef & Noodles has been a Hunt family tradition for generations. As best I can tell, it began as a way to stretch a limited and relatively expensive meat supply across a large family. My grandfather had six sisters, so just imagine for a bit what it took to feed a family of nine. In turn, my grandparents had five boys.

A slight digression

I like cottage cheese – the good stuff, not that low-fat garbage. And my grandparents always had “the good stuff” as part of a relish tray at family gatherings. I remember asking my dad why he didn’t like cottage cheese, since obviously his parents did. He replied that they never had it growing up. So the next time I was with my grandparents, I asked my grandfather why they never had cottage cheese when their kids were growing up. I’ll never forget his reply. “Oh we love cottage cheese. But we had five boys to feed. We couldn’t afford it.” The idea that a certain food was such a luxury item that they never bought it – even though they liked it – has stuck with me ever since. To this day, we keep a quart of “the good stuff” in the fridge, and Macy and I often sit down and share it in memory of my grandparents.

Recipe

Ingredients

  • Beef Roast
  • Flour
  • Eggs
  • Salt
  • Pepper
  • Garlic
  • Potatoes

Egg Noodles

You can do this the day before, or you can do it while the beef is boiling. Grandma used to make loads and loads of egg noodles, dry them, and then freeze them for later use.

  1. Add salt and pepper to a cup of flour. Start with 1/4 tsp each salt and pepper.
  2. If you want a slightly lighter, fluffier egg noodle, add some baking powder (about 1/4 tsp per cup of flour). I prefer them without the baking powder.
  3. Start with one egg for each cup of flour and mix together. Technique doesn’t really matter here – just get a good eggy dough going.
  4. To make the noodles, roll them out with a rolling pin using plenty of flour to get them good and thin. Cut them into strips with a pizza cutter, then cut the strips into 1-2 inch lengths.
  5. Toss the noodles in a little extra flour and let them air dry. If you want to freeze them, dry them in a warm oven and then freeze them.

Beef Broth

  1. Boil the beef roast with plenty of salt, pepper and garlic cloves. We brine ours for a couple of days, but grandma never did. Boil it until the beef falls apart.
  2. Remove the beef roast and fat chunks from the broth let it cool a bit. Taste the broth and add salt and pepper as necessary for a good broth.
  3. Get the broth to a rolling boil and add the egg noodles.
  4. Once the noodles are cooked, reduce to a simmer.
  5. The extra flour on the noodles will help the broth to thicken.

Fried Beef

  1. Add salt and pepper to a cup of flour.
  2. Shred the beef into bite-sized chunks and coat in flour.
  3. Fry the beef in butter in a cast iron skillet until it’s crispy. We use a deep fryer with beef fat. It’s not 100% authentic, but it’s a good trade-off for the time savings.

Potatoes

  1. Peel 3-5 pounds of Idaho (white) potatoes. Dice and boil in salty water until fork tender.
  2. Strain potatoes and place in mixer. Add a stick of butter, 8oz package of cream cheese, and a slosh of whole milk.
  3. Mix on low speed until well blended. Add salt as necessary.
  4. Once thoroughly mixed, increase the speed for a minute to whip the potatoes.

Serving

Place a heaping scoop of potatoes into a shallow bowl. Add a scoop of noodles and broth to the center of the potatoes, pressing out a well in the process. Top with a few pieces of fried beef. Grab a spoon and enjoy!

Leftover Potatoes

We usually make extra potatoes so that there will be leftovers for breakfast the next morning. To make some of the best potato pancakes you’ve ever had, form a pancake and fry in plenty of salty butter until golden brown on both sides.

Our Cabinet Pick Trumps Them All

Continuing on with the outdoor kitchen, we’ve started in on some “custom, built-in” (that’s city-speak for “homemade”) cabinets. Melissa and I laid out a basic design in pencil on the decking soon after we finished that part, so we had a rough idea of the overall size and shape.

Framing

The first thing we did was build the bottom form, notching it around the cedar posts…and making sure things were generally square. We decided to use 2×3’s to do the build because they’re cheaper than 2×4’s, and they’re plenty strong enough for the job. The big decision here was how deep we (we being Melissa) wanted the cabinets to be. We knew we wanted them to be at least general cabinet depth, but we had a few specific pieces we wanted to store. One of those pieces is the rolling ice chest you can see in the picture below. Ultimately, we decided on a 26 inch depth from front to back, which equates to a 21 inch “gap” from front to back, which you can see in the picture below.

Once we had the bottom form in place, we had to decide how tall we wanted the counter top to be. Ultimately, we decided on a 36 inch height. The next step was to build corner pieces consisting of two 33 inch 2×3’s. We eyed them up, clamped them down, then screwed them together. To attach them to the base, we did 45 degree screws, one in each end of the corner.

Next came the top, which was pretty easy, since it was essentially the same as the bottom. We attached the top rails screwing straight down into the corner posts and intermediate supports. When we had everything framed in, we squared it up and screwed it down into the deck.

Tiling

Cutting the particle board for the top was fairly easy – just a few notches for the cut outs where the cedar posts are. And once we had the top screwed into place, we added a small strip of fascia, some mastic, and laid down the front accent tiles.

One of the more time-consuming parts was laying out the tile for the counter top. Some might say I’m slightly OCD when it comes symmetry and balance. So one of our strategies to aid (confuse?) my critical eye with respect to grout lines – which cannot possibly be straight because we’re using handmade tiles – was to stagger the rows of tiles. That way, any imperfection gets masked enough by the offset tile for my eyes to calm down.

We started in the corner to make sure we had a row of full tiles in each direction…

…and that gave us an interesting opportunity in the second row. To deal with the overlapping offset tiles, we simply cut out the overlapping pieces. Then, we were left with a roughly 4×4 inch void in that second row. We decided to use a blue Talavera accent tile left over from the remodel of the kitchen in our last home. A quick trim on the tile saw and it fit right into place. Almost looks like we planned it that way from the beginning, doesn’t it?

We did make one (giant) mistake. You see that hole in the counter top to the left of the dishwasher where the sink is going? Neither do I…. So, we ordered a vessel sink that will sit on top of the counter and only need a small cutout for the drain, plus a couple small cutouts for the faucet. In the end, it worked out fine. Turns out we both like the idea of the vessel sink better anyway.

Toe kick, doors and shelves are on my to-do list. Melissa and the kids are working on “custom, built-in” mosaics for the back. More to come….

Star Light, Star Bright

It’s amazing to me how beautiful the night sky is out here in the country. In the city, you just can’t see through all the street lights to truly see the majesty of creation flung across the sky. I’ve posted a lot of sunrise and sunset pictures in the past, partly because it’s not easy to capture the beautiful, starry nights we have out here in the country with my cell phone. Tonight, though, things were a little different. The sun had just set – you can still see some of the last remnants of sunset near the bottom of the picture – and it was still casting enough light into the sky for the phone to snap a decent picture of the not-yet-starry night.


A Lesson in Grammar

If answering the 5 W’s of homeschooling, you already know the who (us, and you if you want!), I shared with you the when, and the why. The where is easy, we learn everywhere! The world is our classroom; our garden, the zoo, the grocery store, library, living room floor, dining room table, hammock in the front yard, tree house… We even have a classroom, and if the occasion calls for it, we can sit in there and learn, though we usually don’t. It’s more of an activity access and storage center, with a couple of work stations for art projects and writing. Tune in next week and I’ll give you a classroom tour.

Today, though, I promised to show you an example of our “What,” as in what do we do. “What curriculum do you use?” is a common question that we field. Answer: I don’t have one. After examining several, they all had holes, none of them covered all I wanted to cover in a method that I wanted things covered, so rather than buy them all to piecemeal, I started off by writing my own preschool curriculum. I discovered the Montessori method of education, and really loved it. So a lot of the examples that I share are going to be Montessori and manipulative based.

These are called Grammar Boxes. This week, the kids received an introductory lesson to sentence diagramming. The boys have been familiar with nouns and verbs compliments of Mad Libs, this lesson reinforced their knowledge, and encouraged them to share their knowledge with their little sister. Macy mastered the articles (orange) and nouns (black)

Here is Eryk matching nouns ending in “f” or “fe” with their plurals ending in “ves”

And here Iain is constructing sentences using verbs (red), articles (orange), and nouns (black).

The Montessori method for teaching parts of speech and sentence construction uses color coded word cards, and a labled hard wood organizational box. The Montessori manipulatives can be expensive, you can make your own, or work without them. The boxes, while helpful for organizing and reinforcing the different categories of the parts of speech, aren’t entirely necessary, the key really is in the word cards and sentence strips. As you can see, my kids have no problem working directly on the floor.

I purchased the sentence strips and word cards from Montessori Printshop. They are well worth the money spent, and are a good middle ground if you want to try to make your own and still have a polished look. Print the cards on card stock, or laminate them to help them last longer. This is a great video on the presentation of grammar in the Montessori method.